✨ How To Measure Bra Size
👗 The Wardrobe Essentials
Every killer outfit starts with the right foundation pieces. These are the 5 wardrobe staples that stylists, fashion editors, and style-savvy women universally swear by — the versatile building blocks that make getting dressed effortlessly chic, every single day.
👖 Levi's 501 Original Fit Jeans
The single most iconic pair of jeans in fashion history, and stylists still reach for them first when building any client's wardrobe. The straight-leg silhouette flatters every body type and pairs effortlessly with everything from blazers to crop tops — the ultimate foundation piece that never goes out of style.
✨ SKIMS Fits Everybody Long Sleeve Bodysuit
The bodysuit that celebrity stylists and fashion influencers unanimously call the most versatile layering piece on the market. Its buttery-soft, second-skin fit stays perfectly tucked under high-waisted jeans, skirts, and trousers — giving you a seamlessly polished silhouette without the constant re-tucking battle.
👠 Steve Madden Dina Pointed-Toe Pumps
The go-to heel that fashion editors rely on for everything from date night to office chic. The classic pointed-toe silhouette elongates legs instantly, while the cushioned footbed means you can actually survive an entire evening without kicking them off under the table — style and comfort in one stunning package.
👗 MANGOPOP Bodycon Mini Dress
The viral Amazon dress that TikTok fashion creators and budget-savvy stylists call the best under-$30 piece on the entire platform. The flattering square neckline and stretchy ribbed fabric hug curves beautifully while being effortlessly dressed up with heels or down with sneakers — a wardrobe workhorse for any occasion.
🧥 The Drop Blake Long Blazer
The oversized blazer that fashion influencers and celebrity stylists universally recommend as the single most transformative outerwear piece you can own. Throw it over a t-shirt and jeans for instant polish, belt it as a dress for date night, or layer it over a slip dress — it makes literally every outfit look ten times more expensive.
In the ever-evolving landscape of personal style, where every detail contributes to a cohesive and confident aesthetic, the foundation of your ensemble often goes unseen but never unfelt. Your bra isn’t just an undergarment; it’s the architectural blueprint for your silhouette, the silent partner in every outfit, and the secret to feeling effortlessly chic. Yet, a staggering number of women navigate their days in ill-fitting bras, unknowingly compromising comfort, posture, and the very drape of their carefully curated wardrobes. It’s time to reclaim your power, embrace the art of the perfect fit, and unlock a new level of sartorial confidence. This isn’t just about numbers; it’s about elevating your entire presence, one exquisite measurement at a time.

Quick Overview
Embark on a journey to discover your true bra size, transforming your daily comfort and refining your style from the inside out. You’ll learn the precise measurements needed to identify your ideal band and cup, empowering you to choose lingerie that truly supports and flatters.
- Time needed: 15-20 minutes
- Difficulty: Beginner
- What you’ll need: A soft measuring tape, a non-padded bra (or no bra), a mirror, and a notebook/pen.
Step-by-Step Instructions
Step 1: Curate Your Kit and Set the Scene
Before you begin this ritual of self-discovery, ensure you have the right tools. A soft, flexible measuring tape is non-negotiable – the kind used for sewing, not construction. For accuracy, wear a non-padded, unlined bra that offers minimal compression, or go braless if you prefer. The goal is to measure your natural shape. Stand in front of a full-length mirror, ideally in a well-lit private space, allowing you to observe your posture and the tape’s position. This is your moment to connect with your body, so approach it with intention and a sense of luxury.
Pro tip: Consider playing some calming music or lighting a candle to create a serene atmosphere. This isn’t a chore; it’s an act of self-care and empowerment.
Step 2: Establish Your Foundation – The Band Measurement
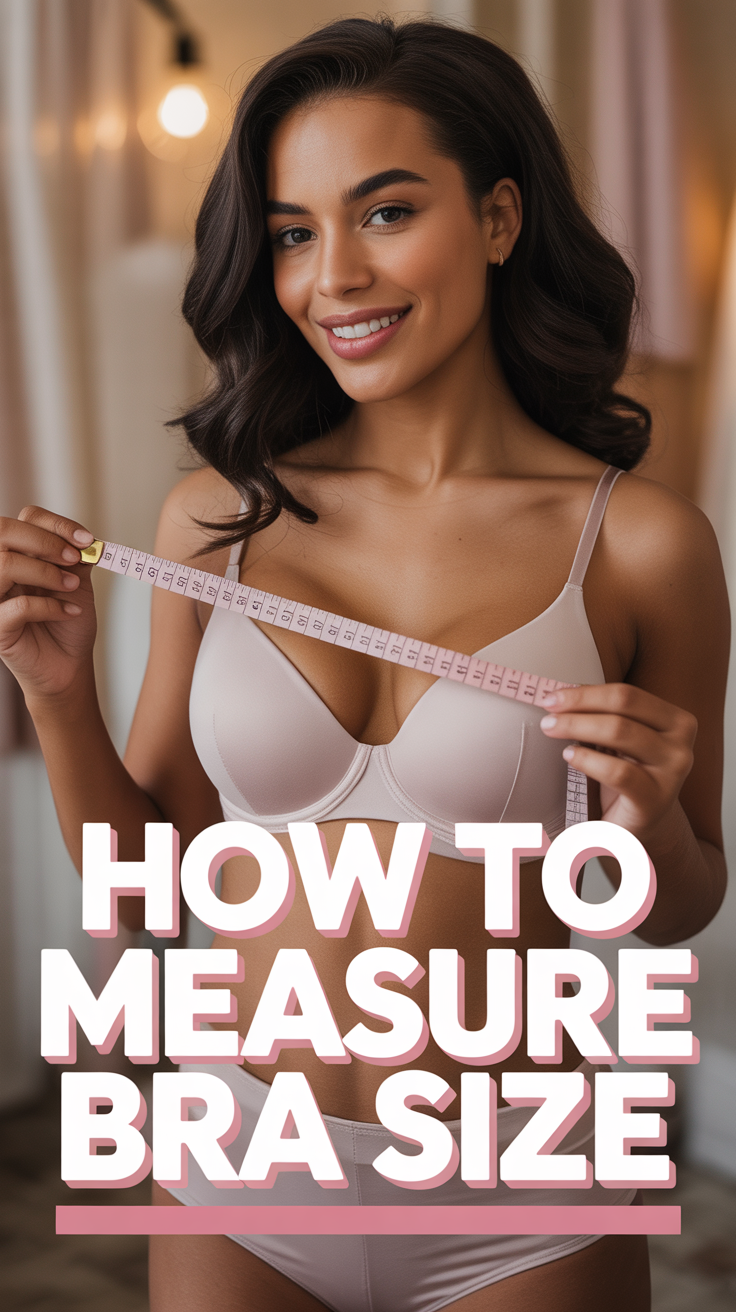
The band is the bedrock of your bra’s support, responsible for approximately 80% of its lifting power. A well-fitting band should feel snug, secure, and level all around your torso. To measure, wrap the measuring tape directly under your bust, where your bra band would typically sit. Ensure the tape is parallel to the floor, firm but not digging into your skin. Exhale fully to get the smallest measurement, as your rib cage expands and contracts with breath. Read the number in inches. If you land on a half-inch, round up to the nearest whole number. This measurement is your starting point for the band size.
Pro tip: If your measurement is an odd number (e.g., 31 inches), many experts recommend adding one inch to arrive at an even band size (e.g., 32). Bra bands are typically manufactured in even numbers, and this adjustment often provides a more comfortable and supportive fit.
Step 3: Unveil Your Volume – The Bust Measurement
Next, we’ll measure the fullest part of your bust to determine your cup size. Stand upright, with your shoulders relaxed and your back straight. Wrap the measuring tape around your back, bringing it across the fullest part of your bust. This is usually at the nipple line. Ensure the tape is level all the way around and not pulled too tightly or left too loose. It should rest gently against your skin without indenting it. Breathe normally. Note this measurement in inches. This number, combined with your band size, will unlock your perfect cup fit.
Pro tip: For the most accurate bust measurement, try to measure with your arms down by your sides. If this is difficult, you can slightly lift your arms to position the tape, then lower them to ensure the tape is truly level and not distorted by your arm position.
Step 4: Decode Your Dimensions – Calculating Your Cup Size
Now, for the elegant equation that translates your measurements into your ideal cup size. Subtract your band measurement (from Step 2) from your bust measurement (from Step 3). The difference between these two numbers corresponds to your cup size. Each inch difference represents a cup size increment:
- 1 inch difference = A cup
- 2 inch difference = B cup
- 3 inch difference = C cup
- 4 inch difference = D cup
- 5 inch difference = DD/E cup
- 6 inch difference = DDD/F cup
- 7 inch difference = G cup
- 8 inch difference = H cup
- And so on…
For example, if your band measurement is 34 inches and your bust measurement is 37 inches, the difference is 3 inches, indicating a C cup. Your calculated bra size would be 34C. Remember, this is a mathematical starting point, and the true fit is always confirmed by how the bra feels and looks on your body.
Pro tip: Be aware that cup sizing can vary slightly between brands, especially international ones. While a D cup in one brand might fit perfectly, you might need an E or DD in another. Always be open to trying on a range of sizes.
Step 5: Embrace the Art of Sister Sizes
The world of bra sizing isn’t rigidly linear; it’s a sophisticated system with “sister sizes” that offer flexibility without compromising fit. Sister sizes share the same cup volume, even though their band and cup letters differ. For every band size you go down, you go up a cup size to maintain the same volume, and vice versa. For instance, a 34C has the same cup volume as a 32D (down one band, up one cup) and a 36B (up one band, down one cup).
Understanding sister sizes is a game-changer, especially when a particular style you adore isn’t available in your calculated size, or if your calculated size feels slightly off. It empowers you to fine-tune your fit, ensuring the band provides optimal support while the cups perfectly encapsulate your bust without gaping or overflowing. This knowledge is particularly useful when exploring different bra styles, as a plunge bra might require a slightly different sister size than a full-coverage style.
Pro tip: If your band feels too loose, try going down a band size and up a cup size (e.g., from 34C to 32D). If the cups feel too small, but the band is perfect, try going up a cup size (e.g., from 34C to 34D).
Step 6: The Ultimate Verdict – The Try-On Test
Numbers are a guide, but the mirror and your comfort are the ultimate arbiters of a perfect fit. Once you have your calculated size and potential sister sizes, it’s time for the try-on test. When trying on a bra, always put it on correctly: lean forward, scoop all breast tissue into the cups, and adjust the straps. Observe how the bra sits on your body:
- The Band: It should be snug and level all around your back, parallel to the floor. You should be able to comfortably fit only one or two fingers under the band. If it rides up, the band is too loose.
- The Cups: Your breasts should fill the cups completely without any gaping at the top or sides, and without spilling over. There should be a smooth line where the cup meets your breast, with no “double breast” effect.
- The Underwire: It should lie flat against your rib cage, directly under your breast tissue, not on top of it. It should not poke or dig into your armpit or breast tissue.
- The Straps: They should feel secure but not dig into your shoulders. Straps primarily provide balance, not lift. If they’re doing all the work, your band is too loose.
- The Center Gore: The small piece of fabric between the cups (the center gore) should lie flat against your sternum, between your breasts. If it floats away, the cups are too small or the style isn’t right for your breast shape.
Walk around, stretch, and move your arms. The bra should move with you, providing consistent support without shifting or causing discomfort. This final step is where the science meets the art, ensuring your lingerie is a seamless extension of your body and your style.
Pro tip: Pay attention to how your clothes drape over the bra. A perfectly fitted bra will make your tailored blouses look crisper, your knitwear smoother, and your dresses more flattering, enhancing your overall aesthetic.
Common Mistakes to Avoid
Even with the best intentions, subtle errors can skew your measurements and lead to a less-than-perfect fit. Sidestep these common pitfalls to ensure your bra sizing journey is flawless.
-
Measuring Over a Padded Bra:
- Why it’s problematic: Padded bras add artificial volume, inflating your bust measurement and leading to an inaccurate cup size.
- Correct approach: Always measure while wearing a non-padded, unlined bra, or go braless to capture your natural dimensions.
-
Pulling the Measuring Tape Too Tightly or Leaving It Too Loose:
- Why it’s problematic: A tape that’s too tight will give you a band size that’s uncomfortably small and a cup size that’s too large. Too loose, and your band will be unsupportive, while your cups will gape.
- Correct approach: The tape should be snug but comfortable, resting gently against your skin without indenting it. For the band, exhale fully to get the smallest, most accurate rib cage measurement.
-
Not Measuring Parallel to the Floor:
- Why it’s problematic: If the tape sags or angles up/down, especially around your back, it will distort both your band and bust measurements, leading to an incorrect calculation.
- Correct approach: Use a mirror to ensure the tape is perfectly horizontal across your back, level with the front of your body, for both band and bust measurements.
-
Ignoring Your Body’s Natural Changes:
- Why it’s problematic: Our bodies are dynamic. Weight fluctuations, hormonal changes, pregnancy, and aging can all alter breast size and shape. Relying on an old measurement or assuming your size never changes is a recipe for an ill-fitting bra.
- Correct approach: Re-measure your bra size at least once a year, or whenever you notice a significant change in your body or feel discomfort in your current bras.
Troubleshooting
Even after careful measuring, sometimes the fit isn’t quite right. Here are solutions to common bra fit dilemmas:
-
Issue: The bra band rides up my back.
- Solution: Your band is too loose. This is the most common fit issue. Try going down a band size (e.g., from 36C to 34C). Remember to go up a cup size if you go down a band size to maintain cup volume (e.g., 36C to 34D) if your cups were already fitting well. The band should be snug enough to stay level on the loosest hook when new, allowing for tightening as the bra stretches over time.
-
Issue: My cups gape or wrinkle, especially at the top.
- Solution: Your cups are too large or the style isn’t right for your breast shape. Try going down a cup size (e.g., from 34C to 34B). Also, consider if the bra style is contributing – some shapes, like balconettes, might gape on certain breast types. A full-coverage or demi-cup might offer a better fit.
-
Issue: My breasts spill out of the top or sides of the cups.
- Solution: Your cups are too small. Try going up a cup size (e.g., from 34C to 34D). Ensure you’ve scooped all breast tissue into the cups after putting the bra on. If the underwire is digging into your breast tissue on the sides, it’s definitely too small.
-
Issue: The underwire pokes or digs into me.
- Solution: This could mean the cups are too small, causing the underwire to sit on breast tissue instead of around it. Try going up a cup size. Alternatively, the underwire might be too narrow for your breast root. Some brands offer wider underwires, or you might need to explore different bra styles that accommodate a wider breast base.
Key Takeaways
- Your bra size is a dynamic measurement; re-measure periodically.
- The band provides the majority of support; ensure it’s snug and level.
- Measure your band underbust (exhaling) and bust at the fullest point.
- Calculate cup size by subtracting band from bust measurement.
- Embrace sister sizes for flexible, optimal fit.
- The try-on test in a non-padded bra is the ultimate fit confirmation.
- A well-fitting bra enhances comfort, posture, and the drape of your clothes.
Frequently Asked Questions
Q: How often should I measure my bra size?
A: It’s recommended to measure your bra size at least once a year, or whenever you experience significant weight changes, pregnancy, breastfeeding, or simply feel that your current bras aren’t fitting as well as they used to.
Q: Can my bra size change even if my weight doesn’t?
A: Yes, absolutely. Hormonal fluctuations (e.g., menstrual cycle, menopause), age, and even changes in muscle tone can affect breast tissue density and shape, leading to a change in bra size without a noticeable shift in overall weight.
Q: Do different bra styles (e.g., push-up, balconette, full coverage) require different sizes?
A: While your core band and cup calculation remains your starting point, different bra styles are designed to accommodate and shape breasts in unique ways. You might find you need to slightly adjust to a sister size for optimal fit in certain styles (e.g., a balconette might require a larger cup for full coverage than a full-coverage bra). Always try on the specific style you intend to wear.
Q: What if I’m between sizes?
A: If your measurements fall between two sizes, always prioritize the band. A snug band is crucial for support. If you’re between band sizes, usually round up to the nearest even number. If you’re between cup sizes, trying both the smaller and larger cup in your correct band size is the best approach to see which offers the most seamless and comfortable fit.
What’s Next?
Now that you’re armed with the precise knowledge of your true bra size, the world of exquisite lingerie awaits. This isn’t just about finding any bra; it’s about curating a collection that complements your lifestyle, enhances your wardrobe, and elevates your confidence. Explore different bra styles—from the elegant simplicity of a seamless t-shirt bra to the delicate allure of a lace balconette—understanding how each can shape and support. Consider investing in high-quality materials and construction; just as you invest in designer outerwear, your underpinnings deserve the same attention. Research brands known for their inclusive sizing and commitment to comfort and style. Take this newfound empowerment and transform your everyday into an experience of unparalleled comfort and chic sophistication. Your journey to a perfectly tailored wardrobe starts now.